The Main Principles Of Severn Deck Builder
Table of ContentsThe 45-Second Trick For Severn Deck BuilderSevern Deck Builder Can Be Fun For AnyoneExcitement About Severn Deck BuilderHow Severn Deck Builder can Save You Time, Stress, and Money.Severn Deck Builder for Beginners
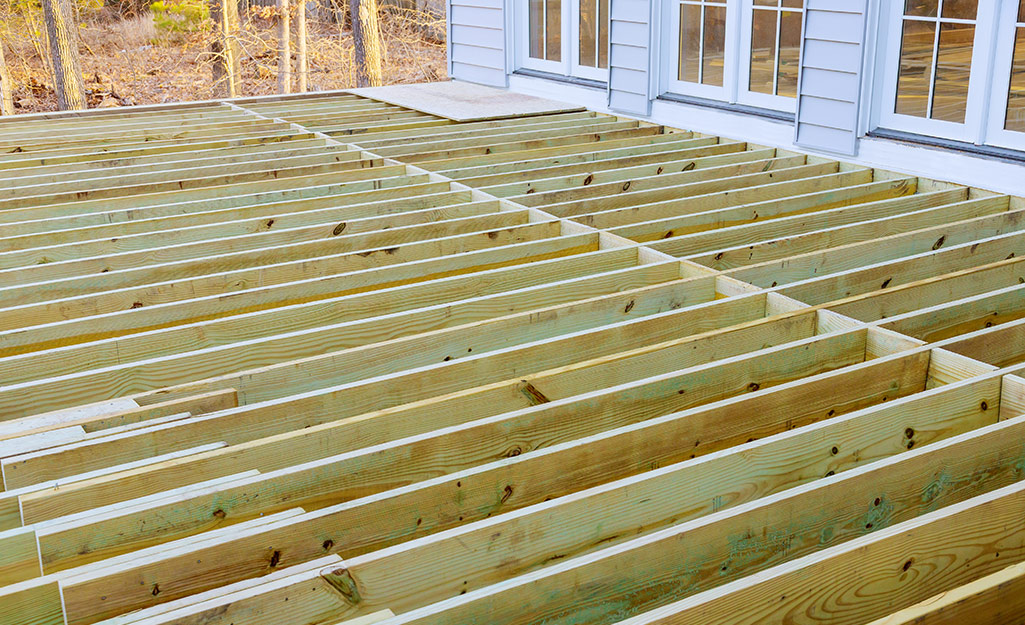
I additionally utilized some flashing tape along the front and side beam of lights to safeguard the wood from resting in water. This tape costs concerning 9. 00 for 10m. When all the light beams had been joined I checked the entire structure to ensure it was also as well as safeguard. The last thing you desire is a creaky unsteady deck.To ensure a great strong framework I made use of best tilted brackets to protect the structure to the floor. I pierced openings into the concrete making use of a masonry little bit, inserted a plastic plug as well as solid screw for an excellent solid repair. I did this in concerning 8 different places and after that inspected the structure once more by walking throughout all areas.
Adding the decking boards. For this you'll need a tons of outdoor decking screws and an impact motorist. You can make use of a normal drill drive however utilizing an influence driver at this point truly quickens the procedure. I used 10 screws per board to make sure a good strong fit and also stop any movement.
I created a number of 3mm spacers that I placed in between each board as I secured it to the frame. This permits a nice even area in between each board. When placing each screw please ensure there are no splinters standing out by eliminating them with your hand or fining sand off.
See This Report on Severn Deck Builder
Offer the decking a light fining sand to eliminate any type of splinters or harsh edges. Utilize a 80 grit adhered to by a 120 (or 200) grit on an orbital sander to provide a nice coating. It's really essential to treat your outdoor decking area asap after completion. This will certainly safeguard it from the weather and also the probability of decaying.

22 x 4. 8m lengths of decking boards (32mm webpage x 120mm) 20 x 2. 4m 32 CLS building and construction timber (38mm x 47mm) 400 x 70mm slim decking screws100 x 80mm timber screws8 x 4m weed control barrier8 x appropriate angled brackets32 x 50mm screws Now on to a raised deck. This was the second decking area I constructed in my garden.
The 8-Minute Rule for Severn Deck Builder
Once again, I'll simply speak about the outdoor decking below however feel totally free to take a look at my outdoor patio article to see exactly how this covered area was accomplished. This is a photo of the completed post. I made a decision to include a planter and also roofing to this which really completes it off. Like before you should exercise where you desire the decking and also exactly how big it will certainly be.
( It does occur) This is the area we made a decision to develop the decking location. It's the place in the garden that obtains the last bit of sunlight for the day so you can take pleasure in a beverage and also enjoy the sun drop. Once you have actually determined up and your products are ready it's time to outline your framework.
The decking boards I acquired were 1. 8m long so I had to distribute this length from the fencing. I decided to affix a support beam of light to the back fence blog posts for the rear assistance as these were really strong. I after that defined 3 points to which the front sustains would certainly go. Severn Deck Builder.
I after that dug out 3 openings at these locations. Each hole was concerning 300mm x 300mm and around 400mm deep. I disoblige 50mm of hardcore in all-time low of each and also then set each blog post in the hole with Postcrete. I utilize hardcore near the bottom to permit drain so all-time low of the message doesn't rest in stationary water and also rot - Severn Deck Builder.
Not known Factual Statements About Severn Deck Builder
Always utilize a level when establishing the blog posts. Postcrete is readily available as all set to blend 12. 5kg bags from the majority of Do It Yourself equipment shops. Simply include water to the mix in a pail and also mix up until ready to pour. I only made use of one bag for 3 messages. Just get whatever ready before hand as this stuff dries really rapidly.
It's extremely helpful to have somebody aid with this component however I handled on my very own. As you can see below I had 2 lengthy posts and one short message at the redirected here far left side. It matters not if each post goes to various heights at this moment as you can reduce them to dimension after that.
For included defense from water I covered the weed material around the frame on the sides and repainted the structure. Jabbing a couple small holes in the base of the product enabled some drain. The framework is merely screwed to the messages at the front and rear of the deck area.
This is only due to the fact that I utilized smaller 32 support beams. You can make use of thicker light beams or add even more support messages if you wish. As soon as the structure is total and secure you can currently include the decking boards. Mine were all 1 - Severn Deck Builder. 8m long so I really did not need to reduce any down.
Severn Deck Builder Things To Know Before You Get This
Once more I used 3mm spacers and regarding 8 screws per board to make certain a good solid fit. I really find out here now overestimated the variety of boards needed below and also ended up 2 except finishing. As opposed to returning to the store to purchase even more I chose to make use of some old oak boards to build a planter at the end.